Moving to a new place and wondering how to move your dishwasher with you? Fortunately, most built-in dishwashers can be removed and transported if you follow the right steps. But since these machines are hooked up to your home’s plumbing and electricity, you can’t just slide them out like many other appliances. In this article, we’ll cover everything you need to know about how to move a dishwasher safely and successfully.
Why It’s Important to Move Dishwashers Properly?
Dishwashers require special handling when you move them since they’re built to stay in one place. If you move your dishwasher incorrectly, you can end up with expensive repairs and avoidable safety risks.
Below are the main reasons why moving a dishwasher properly is crucial.
- Prevention of appliance damage: Dishwashers contain small electrical components and water systems that are not designed to be moved frequently. If you tilt or shake the dishwasher too much during your move, you risk damaging the motor or control circuits, which are essential for normal operation.
- Safety for movers: Moving a dishwasher by yourself is unsafe since most units weigh around 160 pounds or more. The weight can strain your back muscles and cause lasting damage to your spine. The bulkiness also makes it easy to lose your grip, which could result in the appliance falling on your feet or crushing your fingers.
- Protecting your property: Water is often trapped inside dishwashers even when they appear empty, and it can spill on your floor during a move. The dishwasher’s weight can scratch hardwood floors or chip tiles if you don’t use appropriate protective equipment and materials.
What You’ll Need to Move a Dishwasher?
Moving a dishwasher successfully requires having the right tools and equipment at hand before you start. First, determine if relocating your dishwasher makes financial sense, especially if your new home already has one. If you decide to move your dishwasher anyway, here’s everything you need to move it safely.
- An adjustable wrench loosens the compression fittings that attach water supply lines to your dishwasher.
- Screwdrivers are used to remove mounting screws and brackets that hold your appliance in place. Make sure that your screwdrivers work on both Phillips and flathead screws.
- Towels and sponges will help you clean up water that will pour out when you disconnect the hoses and empty the unit.
- A bucket will catch water that drips out of the drain hose and the internal components. The dishwasher usually holds more residual water than most people expect.
- Moving straps allow you to lift the dishwasher with less effort by distributing its weight throughout your body. Forearm straps loop around your arms, while shoulder straps distribute the load evenly over your shoulders and back.
- Heavy-dutyratchet straps ensure a tight grip between the moving dolly and the dishwasher.
- Duct tape is used to wrap electrical cords and water hoses around the dishwasher’s back panel. Securing loose parts prevents them from snagging on door frames or getting damaged during transport.
- A wheeledappliance dolly supports the full weight of your dishwasher, allowing it to move smoothly across various floor surfaces.
- Protective blankets and bubble wrapping prevent scratches and dents that may result from handling and transportation. Control panels and exterior corners need extra ki since they’re most prone to damage.
How to Move a Dishwasher?
Moving a dishwasher out of your home involves disconnecting utilities, removing the unit from its cabinet, and relocating it. To prevent damage, follow these 9 basic steps when moving a dishwasher.
1. Check the Manufacturer’s Manual
Start by looking in your dishwasher’s owner’s manual for specific moving instructions for your appliance. Every dishwasher model is unique, and reading the manual will prepare you for disconnecting and moving your dishwasher correctly. The manual also contains important safety warnings and lists the tools required for the process.
2. Turn Off the Power and the Water Supply
To move your dishwasher, begin by switching off the electric power at the circuit breaker or unplugging the appliance if it’s accessible. Next, find the water supply valve under your kitchen sink and turn it clockwise until it is completely closed.
3. Disconnect the Dishwasher
With the utilities safely turned off, disconnect three major connections that link the dishwasher to your home systems: the power cord, the water supply line, and the drain hose. These connections are typically behind a panel that is attached to the underside of most dishwashers with screws.
Disconnect From the Power Supply
Locate your dishwasher’s electrical connection: a standard plug located behind the unit or a hardwired connection. If your unit plugs into a wall outlet, simply disconnect it once you reach the plug. For hardwired models, open the electrical junction box and carefully separate each wire connection. Consider hiring a qualified electrician for this step if you’d rather not do electrical work yourself.
Detach the Water Supply Line
The supply line brings fresh water to your dishwasher and connects to a water valve under your kitchen sink. Depending on the dishwasher’s model, it may connect to a hot, cold, or two-way water supply shut-off valve. You can also shut off the main water valve to your home. Loosen the coupling nut where the line connects to the shut-off valve slowly with an adjustable wrench. Have a bowl or a bucket at hand to catch excess water in the supply line. Follow the line to your dishwasher and detach this point of connection as well.
Disconnect the Drain Hose
Your dishwasher’s drain hose carries dirty water and typically leads to the garbage disposal or the sink drain. Follow this hose from the dishwasher to determine where it’s connected to your plumbing. Unplug the hose by loosening any clamps or pulling it free from its connection point. To prevent slipping or floor damage, clean up spills right away.
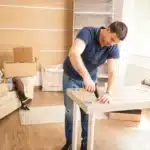
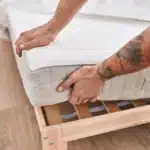
4. Remove the Dishwasher
Now that all connections are safely disconnected, you can remove the dishwasher from its built-in cabinet enclosure. You’ll need help from others since dishwashers are heavy and difficult to handle on your own. To remove the unit safely, follow the steps below.
Unscrew the Mounting Brackets
Open your dishwasher door and look up under your countertop to locate the metal mounting brackets. These mounting brackets prevent the dishwasher from accidentally sliding out during regular use. Use the correct size screwdrivers to remove the screws that hold the brackets to the countertop and pack them carefully. Some dishwasher models also have brackets on the sides that connect to nearby cabinets, so check for those as well.
Adjust the Leveling Legs
Most dishwashers have adjustable legs at the bottom that are set during the original installation to keep the unit level. Before pulling the dishwasher out, lower the legs to create enough clearance. Turn the leveling screws counterclockwise using pliers or an adjustable wrench to raise the legs into the unit. Doing this prevents the legs from catching on the floor or the cabinet frame when you’re sliding the dishwasher out.
Pull Out the Dishwasher
Carefully slide the dishwasher forward from the cabinet opening, with others helping to support and guide it. Move the appliance cautiously and slowly, and watch out for anything that might get in the way. Put down some cardboard to protect the floor and the dishwasher. Stop every few inches to make sure the power cord and the hoses are clear and not catching on cabinet edges.
5. Secure Loose Parts
Before moving the dishwasher, secure all loose parts and connections. Use zip ties or electrical tape to bundle the power cord, the water supply line, and the drain hose together. Attach these connections to the back or the side of the dishwasher so they don’t drag on the floor. Remove racks, trays, and baskets from the dishwasher and pack them separately.
6. Wrap the Dishwasher
Protecting the dishwasher’s exterior during the move prevents scratches, dents, and other damage that can be costly to repair. Cover all sides of the appliance with thick moving blankets and secure them with packing tape, ensuring that no area remains exposed. Do not put tape directly on the dishwasher, since it can leave a sticky residue. You can also use plastic stretch wrap to cover the blankets and hold everything in place.
7. Load the Dishwasher Onto a Dolly
An appliance dolly is an essential tool that makes your dishwasher much easier and safer to move, both for you and your floors. Have another person help you tilt the dishwasher slightly so you can slide the dolly’s flat platform under the base of the unit. Once the dolly is properly positioned, use its securing straps to hold the dishwasher firmly in place.
8. Transport the Dishwasher
Moving your dishwasher safely through your home and to its new location requires planning and a steady hand. Take it slow going through doorways and around corners to prevent accidents and damage to walls. Here’s what to watch out for during transport.
Keep It Upright
Always keep your dishwasher upright throughout the move to protect the internal components. The pump, the motor, and the plumbing only work properly when the unit is upright. If you must tilt the dishwasher on staircases or in tight spaces, keep the angle under fifteen degrees. Return the dishwasher to the upright position as quickly as possible, since tilting it too far will cause internal fluids to flow where they shouldn’t.
Secure the Unit in the Vehicle
Once you’ve successfully loaded the dishwasher into the moving truck, secure it properly to prevent it from moving during the drive. Use ratchet straps or strong rope to tie the unit to solid anchor points inside the vehicle. Put the dishwasher against a wall of the truck for extra stability and support. Place padding between the appliance and the vehicle to prevent vibration damage from bumpy roads.
9. Reinstall the Dishwasher in Your New Home
Installing your dishwasher involves reversing the removal process slowly, while checking that all connections are functioning properly. Call a professional if you’re unsure about any part of the installation. Follow the steps below to reinstall your dishwasher.
Position the Dishwasher
Carefully put the dishwasher into the new cabinet while feeding the power cord and the hoses through the correct openings. Position the unit in the middle of the cabinet and not so far back that you can’t reach the connections. Use the dishwasher’s adjustable leveling legs to raise it to the same height as your countertop, starting with the back. Ensure that the unit is level from side to side and front to back using a level placed inside the dishwasher or on top of it with the door closed.
Reconnect the Water Supply Line
Connect the water supply line to the hot, cold, or two-way water supply shut-off valve, depending on the dishwasher model. Reach under the sink, securing the valve hand tight plus a quarter turn with pliers. Don’t over-tighten the connection, since this can cause leaks by damaging the threads. If your new kitchen setup is different, you might need to get new fittings, such as an adapter elbow or a longer supply line.
Reattach the Drain Hose
Plug your drain hose back into your kitchen drainage system: the garbage disposal or the sink drain pipe. Some localities have building codes that require an air gap fitting on the countertop for proper drainage protection. Other localities allow you to loop the hose high up under the counter before connecting it to the drain. If you’re connecting to a garbage disposal, you’ll need to remove a small knockout plug from the disposal’s dishwasher inlet first.
Reconnect the Power Supply
Restore electrical power to your dishwasher by either plugging the power cord back in or by reconnecting the hardwired electrical connections. For hardwired connections, join wire connections the same way they were connected before the move, using wire nuts to secure them. Put the cover back on the electrical junction box and turn the circuit breaker on before plugging in the unit. Check that the dishwasher’s control panel lights up normally to make sure the electrical connection is working right.
Test for Leaks and Functionality
Run an empty wash cycle to make sure everything works correctly, and watch carefully for any leaks. Notice how the water enters, how the washing looks and sounds, and how well the dishwasher drains when the cycle is finished. Listen for any strange noises that might indicate that something wasn’t connected properly or was damaged during the move. Once you’re satisfied that everything works as it should, install the mounting brackets to hold the dishwasher securely in place.
Special Considerations for Long-Distance Moves
If you’re moving a dishwasher over long distances, it will require greater care compared to local moves. Here’s what to do to avoid damaging your appliance.
1. Label Components Clearly
Your dishwasher has several removable parts that need special handling during long-distance transportation. Take out the dish racks, silverware baskets, and spray arms and pack them separately so they don’t get displaced in the dishwasher. Place small hardware pieces like screws and mounting bolts in clearly labeled plastic bags to prevent them from being lost. Taking photographs before disassembly gives you a helpful reference guide when it’s time to put everything back together. Tape or zip-tie power cords to prevent them from getting tangled or damaged during the move. This systematic process saves time and frustration when you’re setting up your dishwasher in your new kitchen.
2. Prevent Freezing Damage
Water trapped inside your dishwasher poses a serious threat if you move during cold weather, since freezing can crack pipes and damage internal components. Running one final empty wash cycle takes out any remaining food particles and clears the drainage system of debris. After you’ve disconnected the water supply, drain all remaining water from the dishwasher and the standing water in the bottom tub. Dry the interior thoroughly with towels, and leave the door open for several hours for complete air circulation. Using blankets or bubble wrap provides essential insulation that protects against temperature fluctuations during the journey.
How Serenity Moving Services Can Help?
It’s hard work to move a dishwasher, since it involves disconnecting plumbing lines, electrical supply, and safely lifting a heavy appliance. Our experts at Serenity Moving Services load and unload everything for you so you don’t have to risk back injuries or floor damage. We use dollies, hand trucks, and lifting straps to move your dishwasher, ensuring it is handled with care and without scratching your property or damaging the appliance. With 12 years of experience in local and long-distance moving services, we know how to secure dishwashers in our trucks properly. Remember our motto: Peace of Mind, One Move at a Time, and contact us today to get a quote for your upcoming move!